How to share calendars
As described elsewhere, you can control workflow and distribute the calendar maintenance workload by sharing calendars with other account holders.
By default, editors with whom you share cannot create new calendars in their accounts. This prevents them from adding events to calendars other than those you share with them. (If you want one or more editors to create calendars, let your Trumba Sales representative know during your account setup process or contact Support.)
Until you share at least one calendar with new editor accounts, the account holders who sign in see a message instead of the editing environment. Learn more.
Tip Editors with accounts created before April 10, 2013 will still be able to create calendars. To disable calendar creation in these accounts, contact Trumba Support.
What you learn here
For more information about how sharing works, see About sharing calendars.
How to share calendars
- Display the calendar that you want to share by clicking the calendar's name in the calendar list. Click Share above the calendar.

If you don't see the Share button, you displayed a calendar that you didn't create or you have a free Trumba account, which doesn't include sharing.
- On the Sharing page, select or type the email addresses of the people or contact groups with whom you want to share the calendar.
If you already have email addresses in your Trumba Address Book, you see those addresses listed under Select from address book. Select the contacts or contact groups with whom you want to share. Click Add to Shared List.
If you have no email addresses in your Address Book, under Enter email addresses, type or paste the addresses for the people with whom you want to share the calendar. Click Add to Shared List.
- The email addresses appear on the right under This Calendar Is Shared With.

Note If you're sharing with a group, all group members will have the same permission with the exception of editors. To change the group membership, click Edit this group. Any changes you make affect this group in all the contexts where you use it.
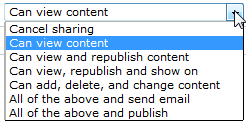
- Set the sharing permission for each person or for the group you're sharing with by selecting the permission you want from the drop-down list.

Publisher account permission levels. You have fewer permission options for editor accounts.
Please show me descriptions of the publisher and editor permission levels
- If you set permission to any level besides Can view content, select the check boxes to the left of the affected email addresses or groups. At the top of the sharing list, select Save Changes.
- Click the Return button or link to return to the calendar you just shared.
How to cancel or change sharing
- Display the shared calendar that you want to change by clicking the calendar's name in the calendar list. Click Share above the calendar.

- Under This Calendar Is Shared With:
- To cancel sharing for one person, on the drop-down list to the right of the person's email address, select Cancel Sharing. Select the check box to the left of the person's email address, and then click Save Changes at the top of the list.
- To change one person's sharing permissions, on the drop-down list to the right of the person's email address, select the type of permission you want or select Cancel sharing. Select the check box to the left of the person's email address, and then click Save Changes at the top of the list.
- To cancel all sharing, select the check box next to each email address or group, and then click Remove Selected.
- Click the Return link or Done button to return to the calendar.
