Customize the Event Actions web app
With Event Actions, you give calendar visitors access to the Event Actions web app.
Publishers with administrative privileges can customize the web app environment to reflect your organization's preferences and brand. Notice in the screenshot below, the custom colors and logo we used for the fictional Trumba University:
I'd like an overview of visitor accounts and the web app.
What are administrative privileges?
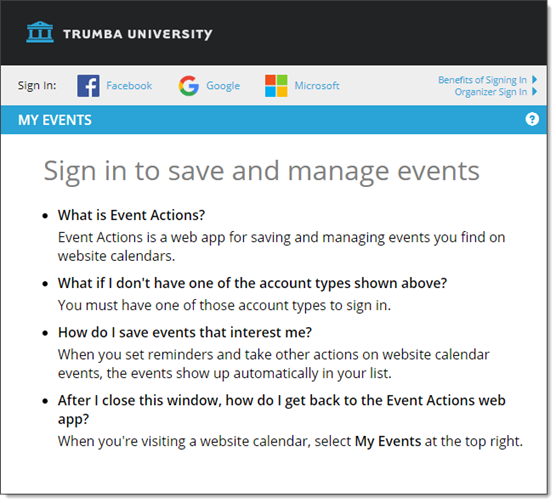
Custom colors and logo for the fictional Trumba University
Topic links
How customization works
The Event Actions web app customization settings are available at the organization (customer) level. This means that the custom settings apply to all published calendars created in that organization's publisher accounts.
Visitors who access the web app from any of the organization's published calendars will see the same organization name, logo, colors, visitor account sign-in methods, date/time options, and more.
Note The Event Actions web app is fully responsive. It has been designed to respond automatically to the device a visitor is using so it performs well in both desktop and mobile environments.
What you can customize
You can customize aspects of how the Event Actions web app behaves and how it looks.
For more detailed descriptions of each option, see How to customize the Event Actions web app.
Customization options for how the app behaves
- How your organization is named in the web app menu
- Which URLs to use for your organization's privacy policy and terms of use
- Whether visitor accounts are optional or required (or unavailable)
- Which sign-in methods are available
- Which domain to use for event actions
- Which event actions are available
- Date and time options for events visitors see in their saved event lists
Customization options for how the app looks
- The logo that appears in the web app banner area
- Background and menu icon colors for the banner area
- Background and text colors for the title bar that labels the current page
- Link styles
- Button colors
How to customize the Event Actions web app
As you go through the process of customizing the Event Actions web app, it's a good idea to preview frequently (see step 4 below) so you can gauge the effects of specific settings.
If you offer events that require registration, try signing up.
Tell me more about event actions.
Tell me more about event registration.
In addition, if you support event submission with sign in, it's a good idea to do some test submissions so you can use the Event Actions web app menu to switch between your My Events and My Submissions lists.
To customize the Event Actions web app:
- Sign in to the publisher administrator account where you want to customize the Event Actions web app.
- On the left, under Tasks, click Customize Event Actions.
- On the Settings and Styles tabs, apply the settings you want.
- To preview, at the bottom of the tabs, click Preview. A calendar opens in the preview window. To open the Event Actions web app, set a reminder or take another action on one or more of the calendar's events. (Or, click My Events above the calendar on the right.)
For more previewing advice, see the introduction to this section.
- When you're satisfied with the way the Event Actions web app looks and behaves, close the preview window.
- In the box at the top of the Edit Settings for Event Actions page, select Enable.
- At the bottom of the page, click OK.
Settings tab options
- Organization

Options include:
- Visitors see the name you type here in the My Organizations section of the Event Actions web app menu so use a name that clearly identifies your organization or role.
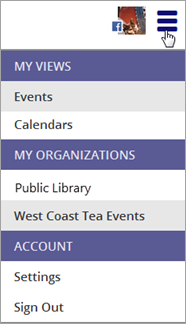
Organization names in the Event Actions web app menu.
Note Only visitors who interact with Trumba calendars published by more than one organization see the My Organizations section in the menu.
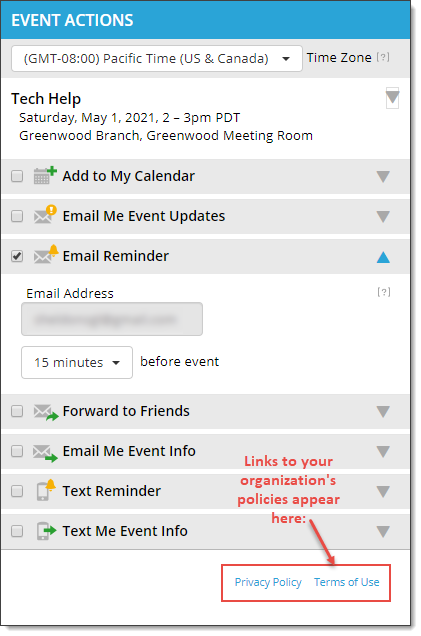
- The Organization privacy policy URL and Organization terms of use URL fields hold links to custom, organization-specific terms of use and privacy policies. Valid URLs for these fields are required for organizations that are targeting customers in the European Economic Area (EEA), in compliance with the General Data Protection Regulation (GDPR). The fields are available, but optional for other organizations. You must submit a valid URL in both fields.
If you have any questions, please email Trumba Sales or call 1-800-925-0388.
The links appear in the footer in Event Actions:
Important For organizations that are targeting customers in the EEA, the Trumba-hosted calendar is available only for the signed-in Publisher account.
- Visitors see the name you type here in the My Organizations section of the Event Actions web app menu so use a name that clearly identifies your organization or role.
- Banner

The logo images you upload here appear on the left side of the web app banner section.

Logo in the Event Actions web app banner section.
Tips
- Supported image file formats include BMP, JPEG, GIF, TIFF, and PNG.
- Images larger than 400x76 pixels (desktop) or 210x57 pixels (mobile) are scaled automatically. If you upload only a desktop image, it will be scaled appropriately for mobile environments.
- For the most control, create the original images with the height limitations of the banner section (desktop 74 pixels; mobile 57 pixels) in mind.
- In the image editing application where you create the image, optimize the image file by using the save-for-web option.
- If you intend to add a background color to the banner, you might want to save the image file as a transparent .png. Or, add space around the image filled with a color that matches the background.
- Visitor Accounts

If you're offering visitor accounts, you can make them optional or required. Optional means all visitors can perform calendar and event actions and can opt to sign in. Required means that calendar and event actions will be available only to visitors who set up accounts.
Tip You can also select Not available to hide the sign-in options. Visitors will be able to take event actions and see your customized event actions pages. However, they will not be able to save events or benefit from other features the Event Actions web app offers.
Select the sign-in methods you want visitors to be able to use. By default, visitors can sign in using their Facebook, Google, or Microsoft accounts. (If visitors sign into Event Actions using their Microsoft account, they can add events to their work, school, or personal calendar hosted on Microsoft 365 or Outlook.com.)
Tip If your organization enabled single sign-on for Trumba® accounts, you can also offer an organizational ID sign-in option for visitor accounts.
I'd like more information about single sign-on.
Organizer sign in link. Relevant only when you're using event check in. Event organizers with Trumba accounts can't sign in directly from the My Events page, although they can from the link in the organizer introduction email they receive. Selecting Yes adds an Organizer sign in link to the top of the My Events page, making it possible for organizers to sign in using their Trumba credentials.
I'd like more information about setting up check in for events.
- Domain Select the domain to use with event actions.
If you secure your calendar by requiring sign in with a visitor account, and if supported by your identity provider, you can change the default domain used with event actions for your account.
Using trumba.com as the domain for event actions can optimize performance for the single sign in and single sign out processes (when supported). See Single sign-on.
- Hide Actions Select the event actions and calendar types you want to hide from visitors. Actions and types you hide are not visible in the Event Actions panel on the published calendar or on the Event Actions page of the web app.
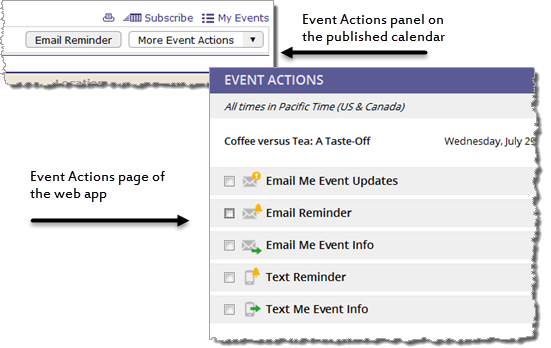
Add to My Calendar and Forward to Friends actions hidden in Event Actions panel and web app.
For example, if you publish private events, you might want to hide the Add to My Calendar and Forward to Friends event actions.
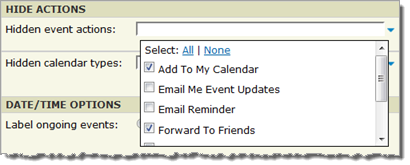
Hiding Add to My Calendar and Forward to Friends actions.
If you support the Add to My Calendar action, you might want to limit the calendar types to which visitors can add events.
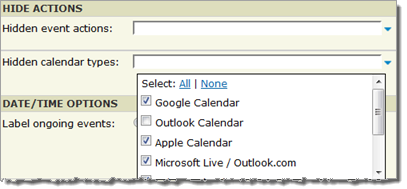
Hiding selected calendar types.
- Date/Time Options Select your preferences for how dates and times will be displayed for events in visitors' My Events and other web app events lists.
- Registration Messaging If you offer events that require registration and you make providing an email address optional, registrants are warned that not providing an address means they won't receive confirmation and other emails.
To customize the warning message, select the default message and type the message you prefer.
Where is the Google Apps option? With Event Actions, it isn't necessary to specifically set up support for adding events to Google Apps calendars. Visitors who use Google to sign in to their visitor accounts will automatically have the option of using their Google Apps sign-in credentials.
Styles tab options
When you choose colors for the banner, title bar, links, and buttons in the Event Actions web app, you can either type a specific hexadecimal color value or use the Color Picker.
One advantage of using the Color Picker is that you can create a custom color palette based on the logo image that you include in the web app banner.
I'd like more details about using the Color Picker.
- Banner Colors

The banner is the area at the top of the Event Actions web app. The banner contains your logo, a signed-in visitor's avatar, and the menu icon.

- The background color (2) is the color behind your logo (1), the user's avatar with sign-in method icon (3), and the Event Actions web app menu icon (4).
If you use a background color other than white, you might want to save the logo image as a transparent .png or surround the image with a color that matches the background.
- The foreground color is the color assigned to the Event Actions menu icon (4).
- The background color (2) is the color behind your logo (1), the user's avatar with sign-in method icon (3), and the Event Actions web app menu icon (4).
- Title Bar Colors

The title bar is the area under the banner that labels the current page. The list of pages includes Event Actions, My Events, My Calendars, Event Detail, and Account Settings.
Tip If you support event submission, the web app will also include a My Submissions page.
The color you apply to the title bar text is automatically applied to the background for the Help icon that opens the page FAQ.

Title bar for the My Calendars page with FAQ Help icon.
- Link Styles

In the Event Actions web app, visitors see links on the My Events and My Calendars pages.
Tip If you support event submission, visitors will also see links on the My Submissions page.
For example, on the My Events page, visitors can click the event title link to see the event details. On the My Calendars page, visitors can click the calendar name to see a list of subscription options. Or, they can click a link to navigate to the full calendar.
You can customize the link and hover colors and add underlining to the link and hover states if you prefer.
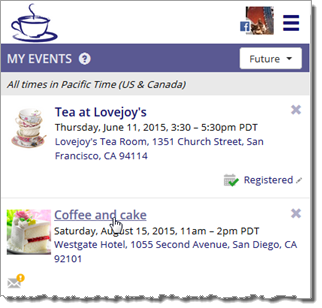
Custom link colors and styles, My Events page.
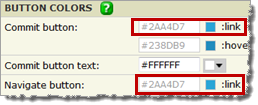
- Button Colors
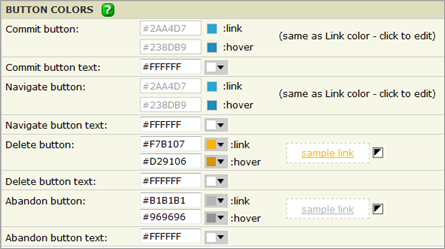
Visitors see a variety of buttons as they move through the Event Actions web app. For example, they see buttons for committing actions (Submit, Save, Subscribe), abandoning actions (Cancel, Close), navigating between pages (Back, My Calendars, My Events), and deleting events.
You can customize the colors for these four button categories. The color labeled link in the Styles form is the button color before a visitor hovers over the button.
Show me which buttons belong to each of the four categories.
